This guide will walk you through the process of setting up your controller for an optimal gaming experience, ensuring you can enjoy the full content of the game without missing a beat.
Steam Input
In order to enable Steam Input, right-click ATLYSS in your Steam Library and select Properties. From there, select Controller. Check that the controller you’re using is connected (it should have a dot next to its name on the list of supported controllers), and that Steam Input is enabled for that controller. If it isn’t, you should explicitly enable Steam Input on this menu.
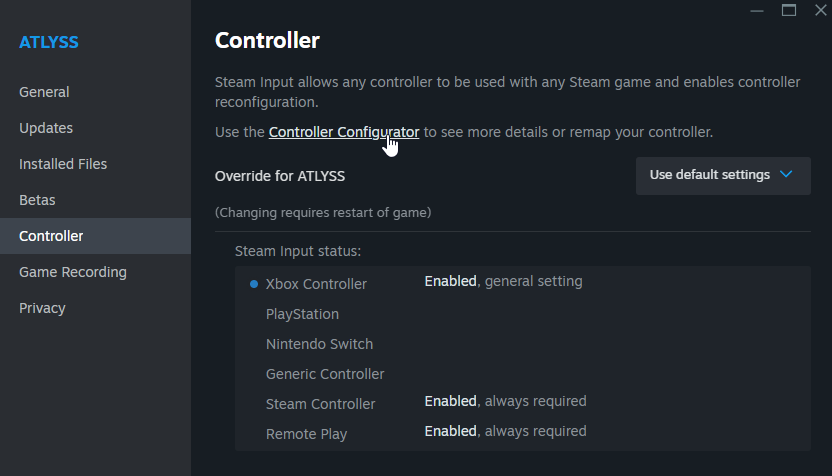
As you can see, I use an Xbox controller and so all visuals will assume an Xbox controller throughout this guide. Any controller should work, however.
Next, click Controller Configurator.
Controller Configurator
If you don’t yet know what you’re doing with this, you should start by choosing a configuration that someone else has already made.
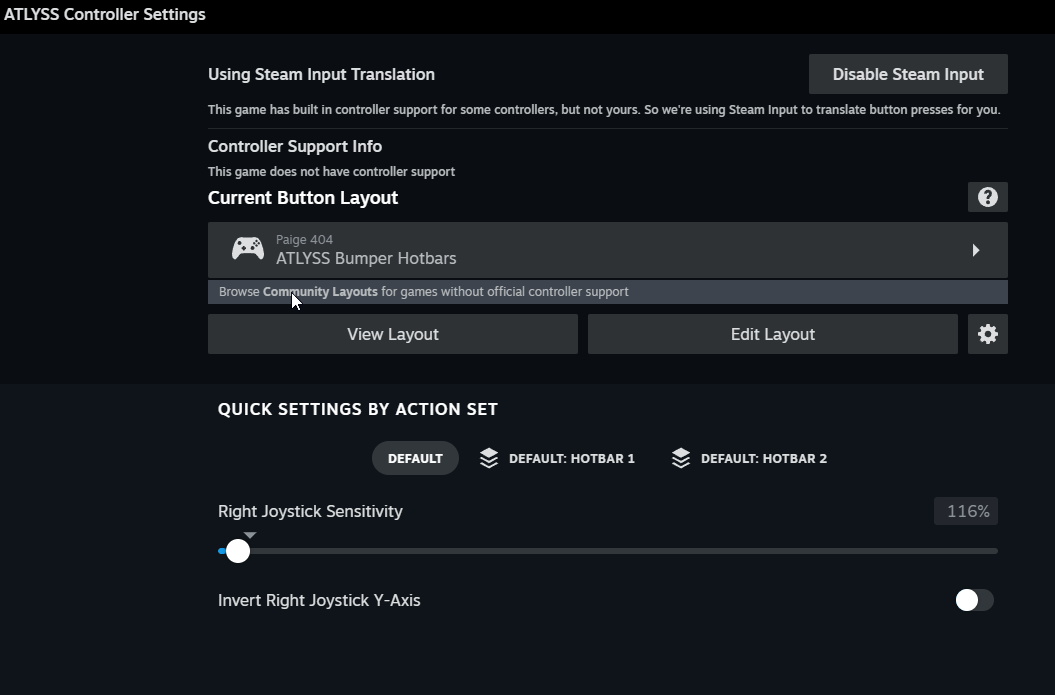
Click “Browse Community Layouts” to begin. It will now provide a layout selection panel. Select “Community Layouts” at the top.
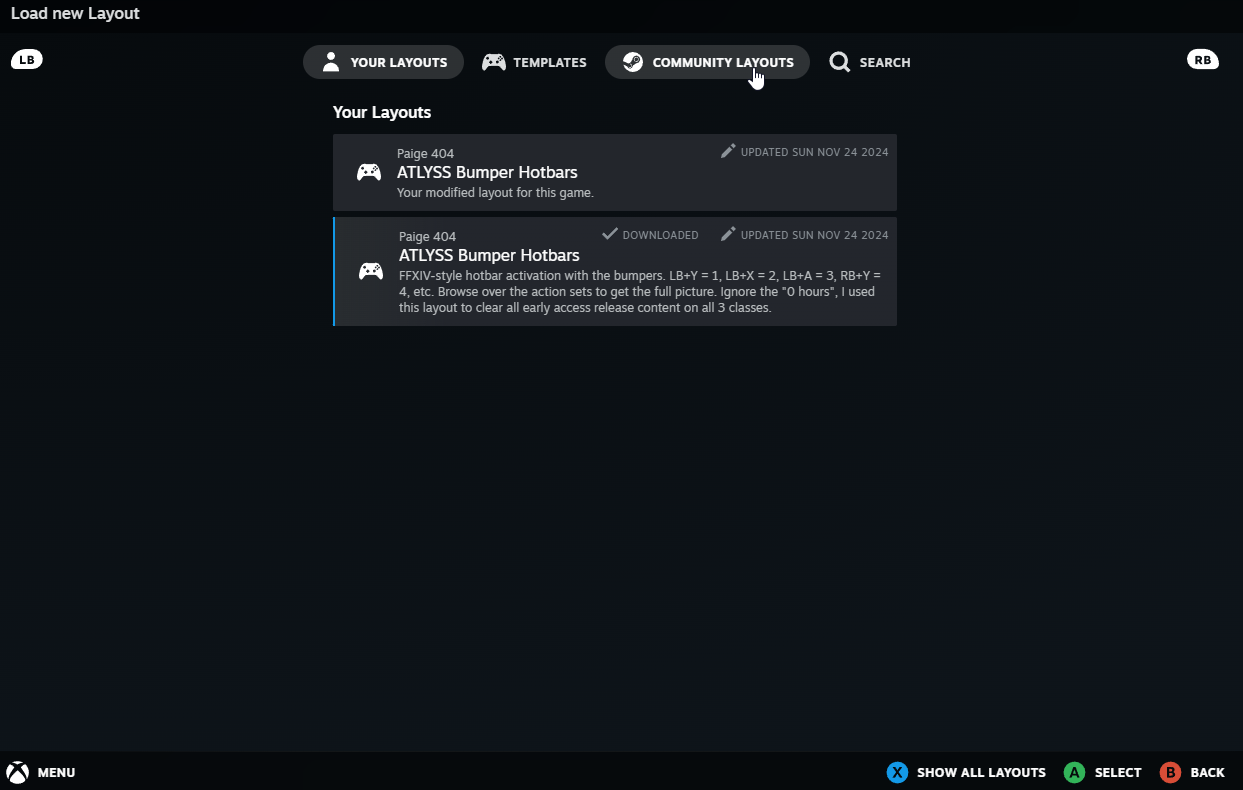
This will display a list of community layouts which you can browse over, as well as the hours that have been played with those layouts throughout the community. You could just choose the most popular one, but as you browse over layouts you will discover that people have very different approaches to layout design–what feels good and intuitive to some is clunky and awkward to others, and some configurations may leave bindings out entirely that the creator feels aren’t important to their own playstyle.
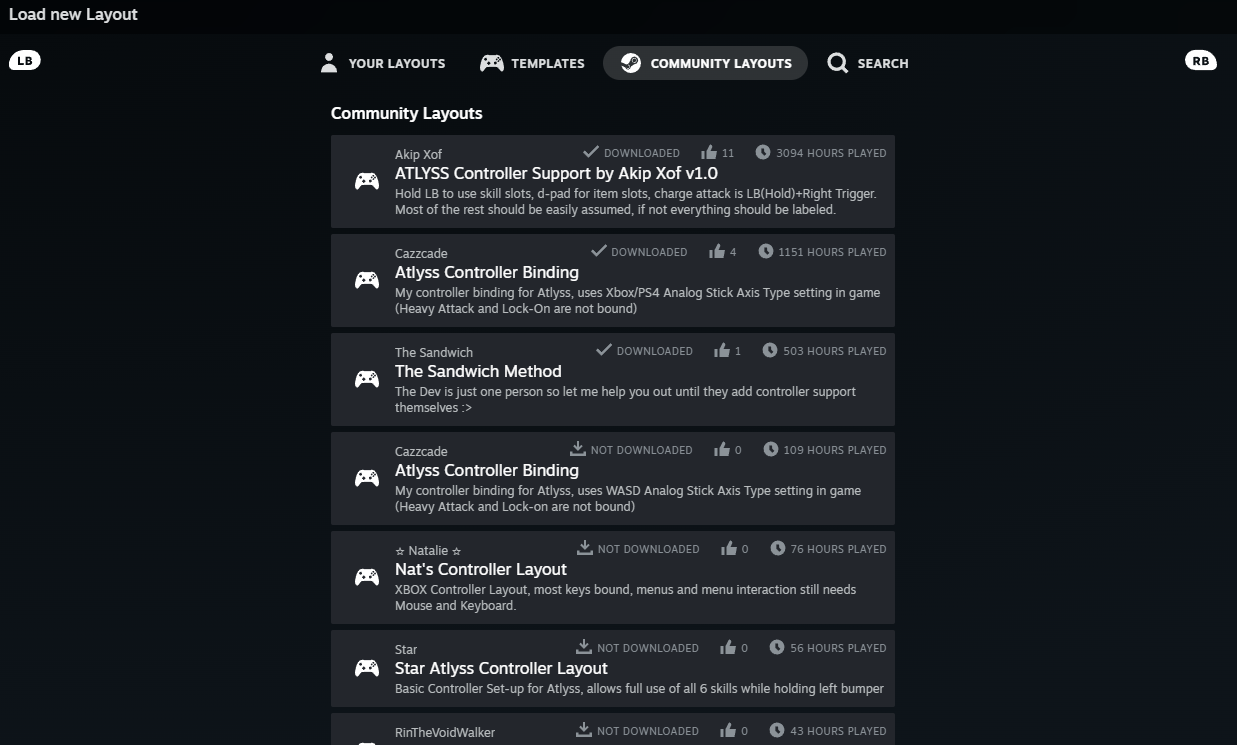
I could tell you to use mine (it works well for me), but I really do think you would do best browsing and examining layouts for yourself. To that end, I’ll explain a bit about how Steam Input configurations work, and show what they look like.
Picking A Configuration
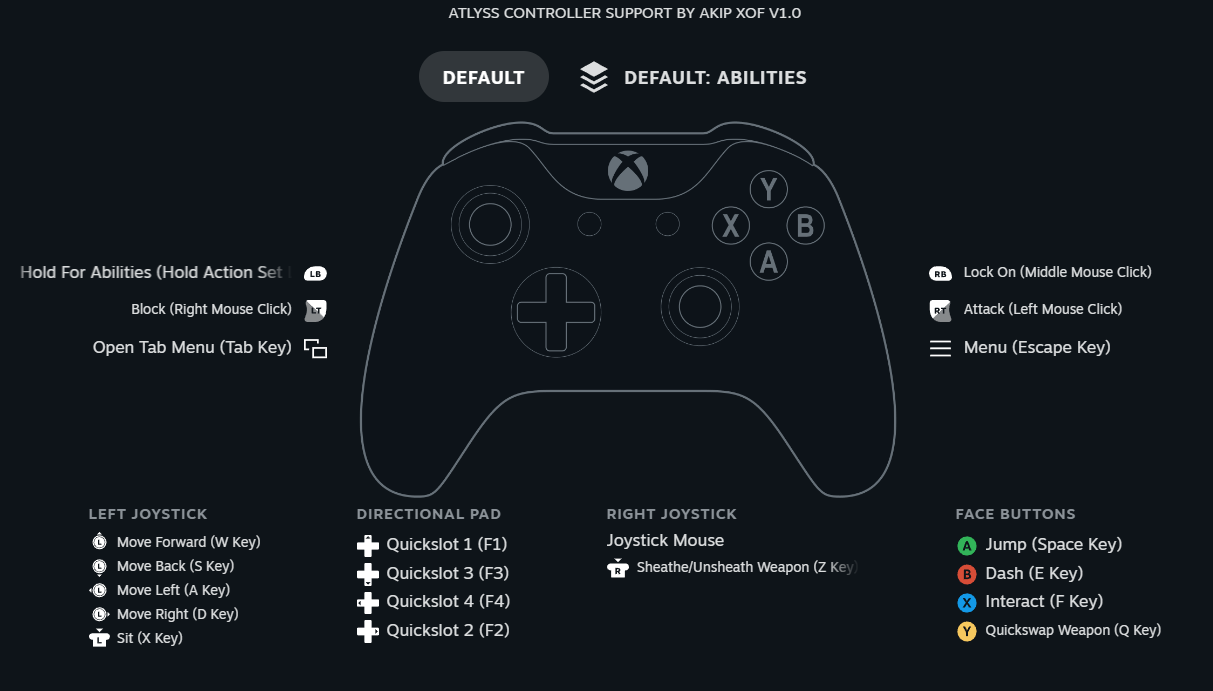
All buttons not only show what key they correspond to on the keyboard and mouse, but are labelled with the intended function of that key in the game. A is Jump, B is Dash, X is Interact, Y is Quickswap Weapon. One odd one is the Left Bumper, which activates an Action Set Layer. Action Set Layers are used to contextually rebind buttons, in this case when the Left Bumper is pressed. Let’s take a look at that action set layer, “Default: Abilities”
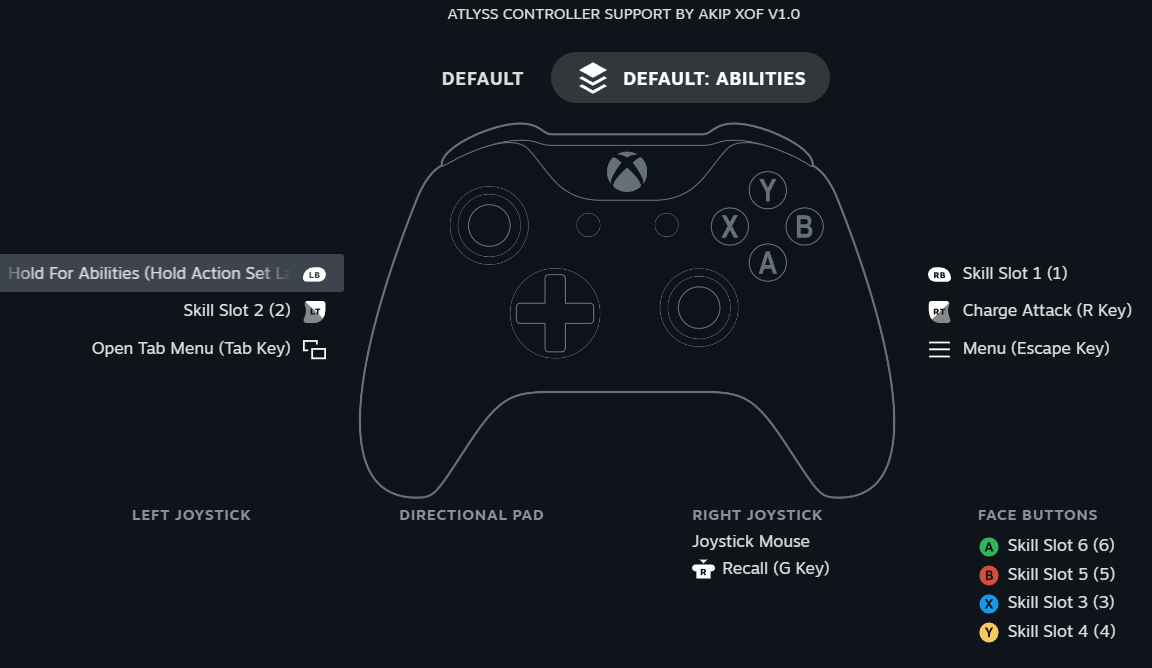
As you can see, several bindings have changed. A became Skill Slot 6, B became Skill Slot 5. This means that when playing, holding Left Bumper and Pressing A will activate Skill Slot 6 instead of Jump.
This may look complicated, and without UI elements that guide the player through this it can have a steep learning curve. But using buttons as modifiers like this is very common in official controller configurations for many games, and with some practice and patience it shouldn’t be too hard to pick up.
Let’s look at a simpler layout now, the second most popular: “ATLYSS Controller Binding” by Cazzcade.
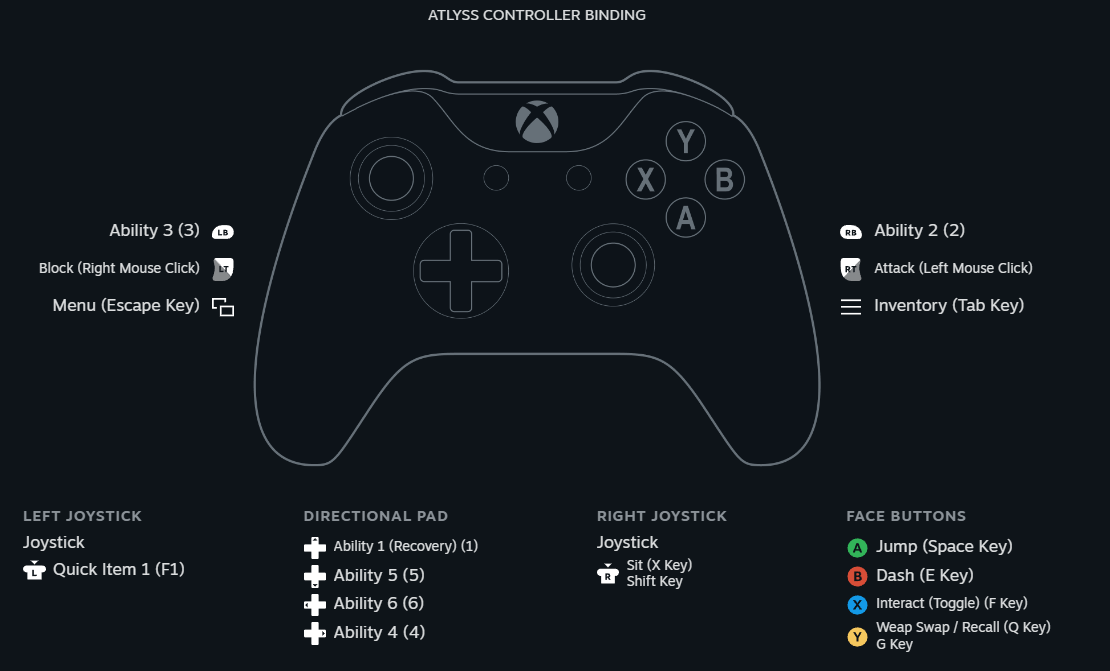
This one is also well labeled, but it doesn’t involve any Action Set Layers at all. This limits its possible bindings, however; with so few buttons, a controller kind of relies on those contextual modifiers to support most modern games.
To fit to the controller, this layout sacrifices most of the Item bar, only providing access to the first item on the bar (F1). It also sacrifices the Charge attack, which isn’t relevant until around level 10 but may be very relevant to your playstyle later. If you don’t tend to use consumables and don’t intend to use Charge attacks though, this simple layout may be perfect for your needs.
It is doing something interesting that isn’t quite obvious, though. Note the Y button, which is both a Weapon Swap and the Recall spell. You don’t want to be recalling every time you swap weapons, so let’s take a closer look at what’s happening there. Select that binding and press A (or click it).
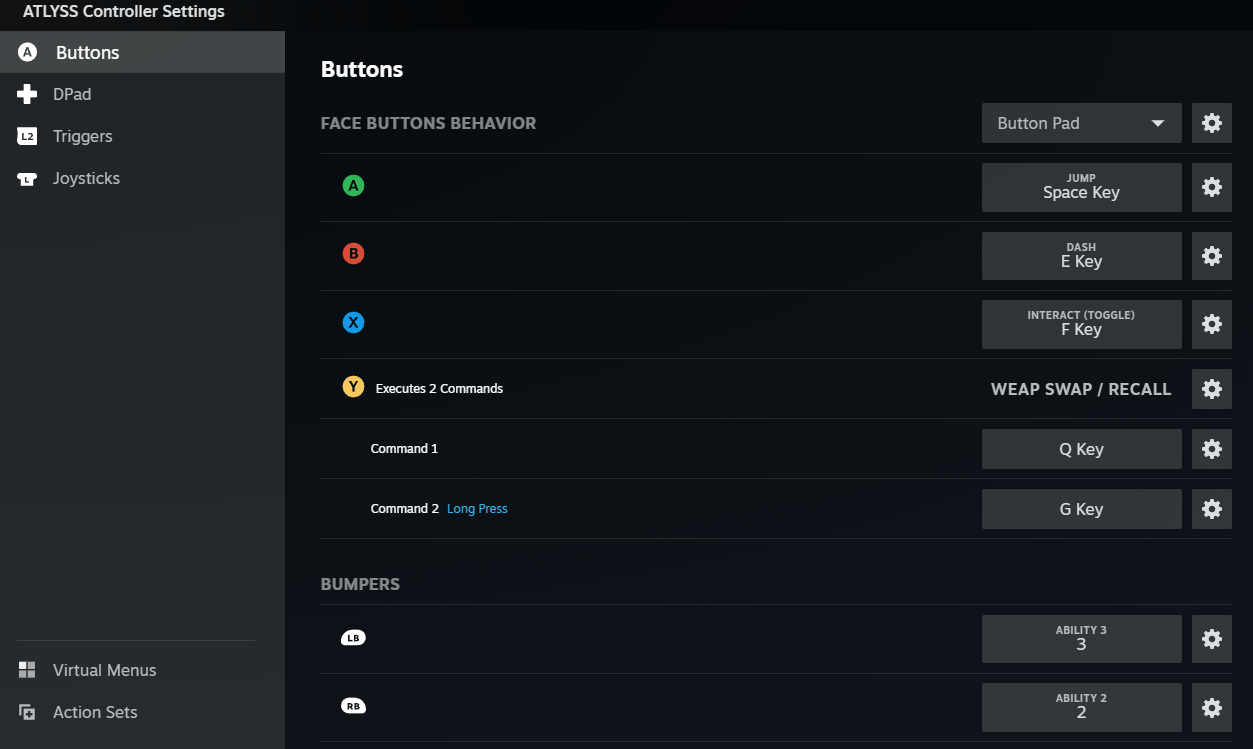
Now we’re really under the hood of this configuration, and we can see what’s happening with the Y button: It’s Q (weapon swap) on a short press, and G (Recall) on a long press. Pretty neat!
Let’s look at another one, “✰” by okometsubuelvis.
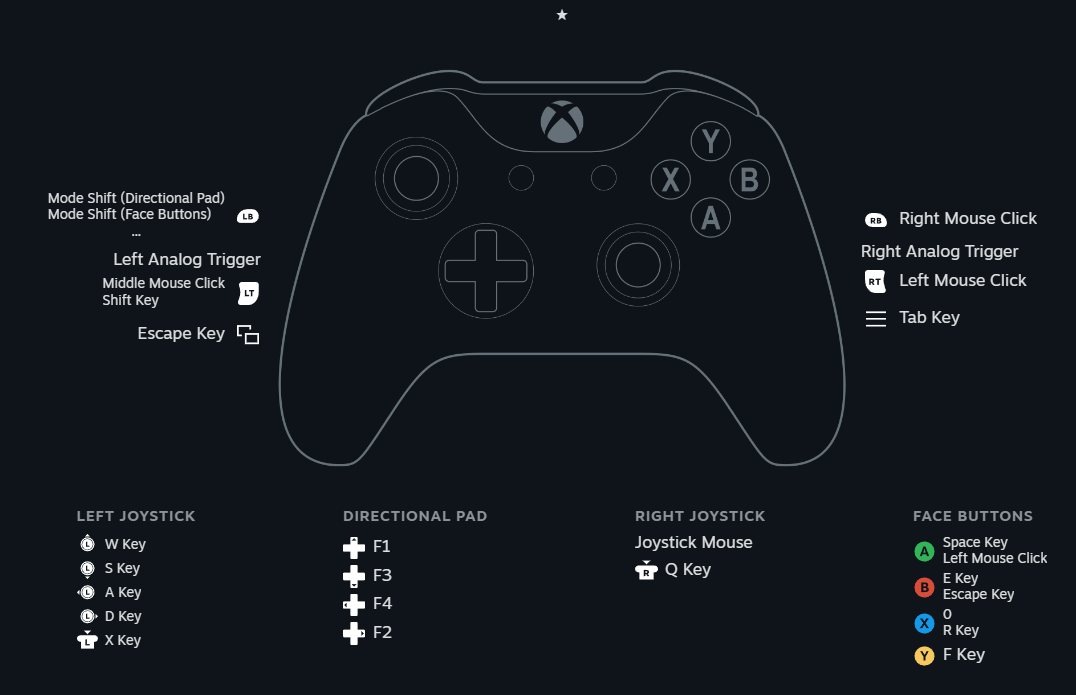
Whoa. This one is weird. All the face buttons have multiple bindings, so they’re probably short vs long press. But what’s this “Mode Shift” on the Left Bumper?
Mode Shift is similar to an Action Set Layer; it creates a contextual rebinding when it’s activated. Let’s look under the hood.
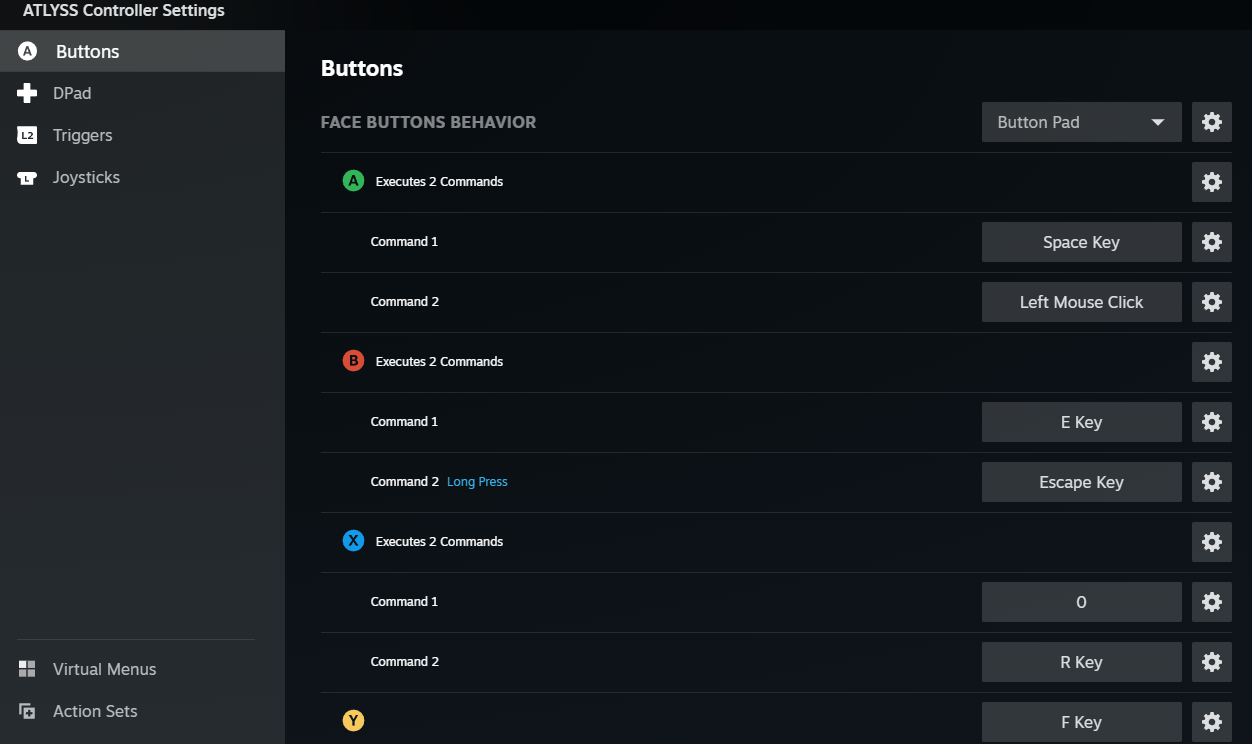
This one continues to surprise. The B button has short and long press bindings, but the others just act as multiple keys pressed at once. Let’s scroll down and find the mode shift.
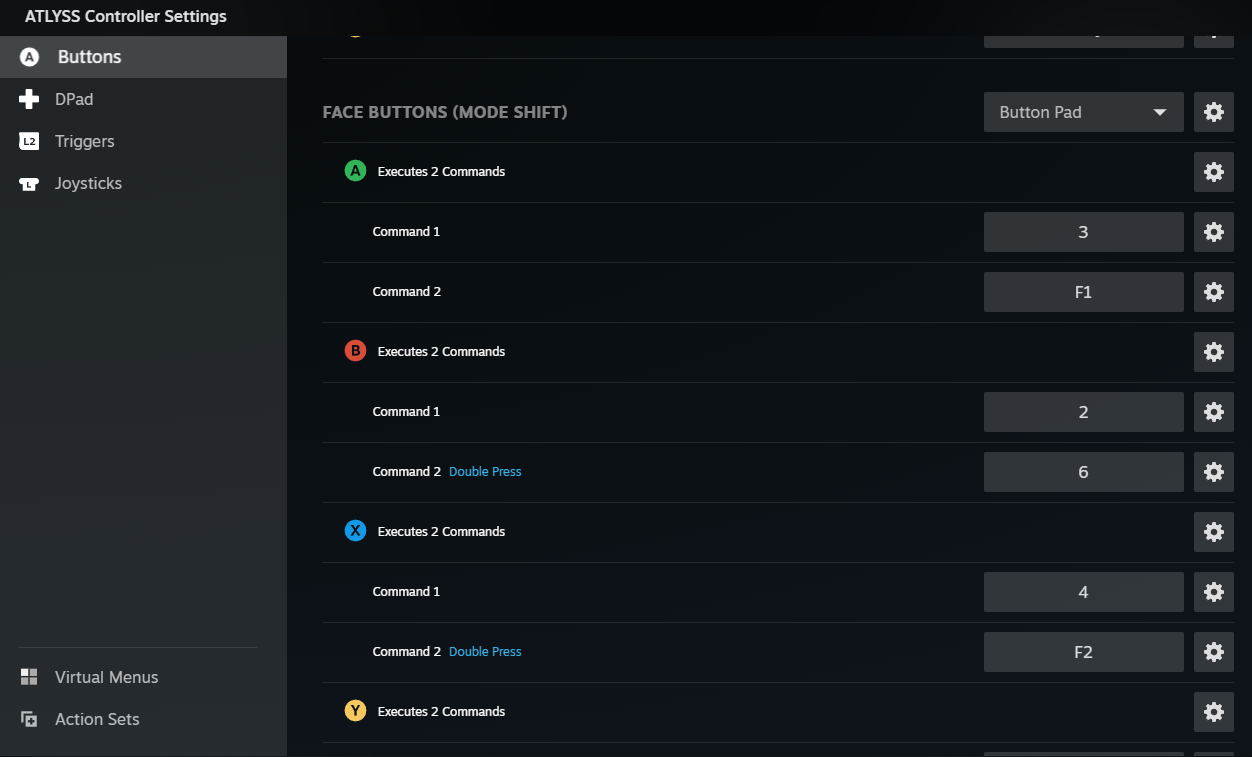
Huh? None of these bindings were visible from just viewing the configuration. And the bindings themselves are doubled up even here.
I’m not here to knock anyone’s configurations, and I assume this one serves the needs of its creator. But it’s pretty baffling to me, and serves as a good example of how important it is to look carefully at a controller configuration before you jump into it.
Mode Shift in particular is deceptive, as unlike Action Set Layers it doesn’t show any of its rebindings on the configuration viewer. It does have some really good unique uses, however, as we’ll see in one last example. Let’s look at “Mausu KB&M to Controller Config” by CheddarMkIlll (apologies if I messed up the barcode-ish bit at the end, Cheddar).
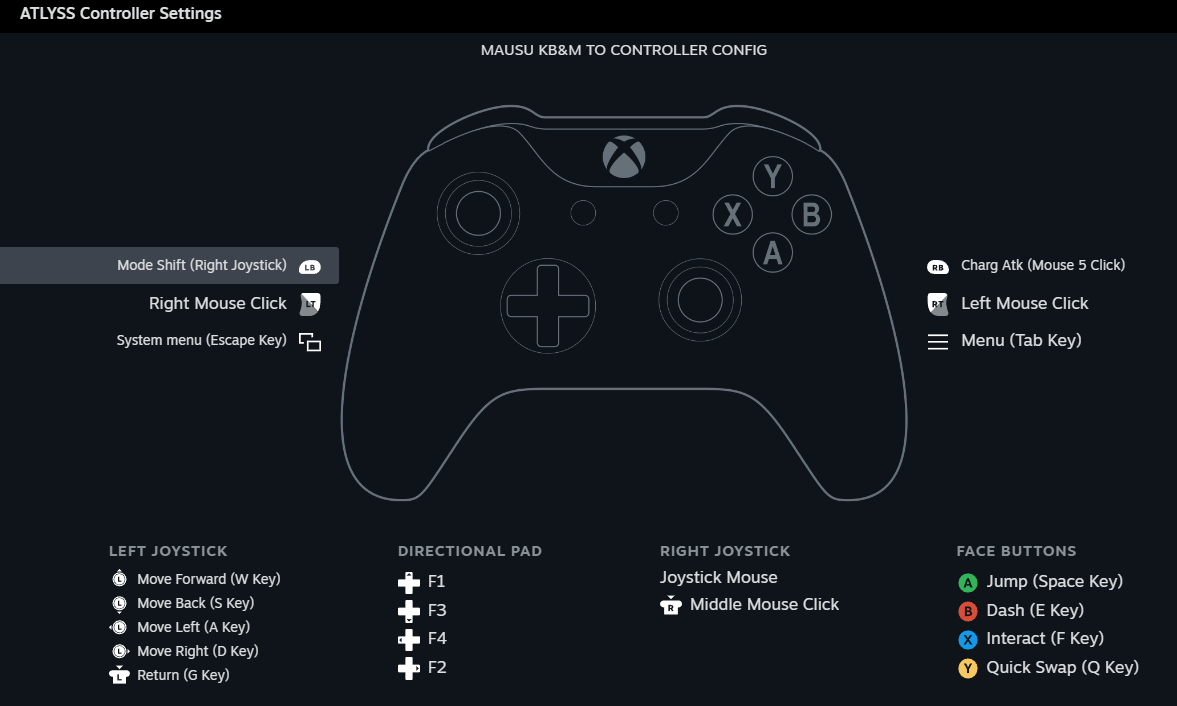
Cheddar’s config also has a Mode Shift that is applied with the left bumper, but this one only impacts the right stick. Because it’s a Mode Shift, though, we do need to look under the hood to see what’s happening to the right stick.
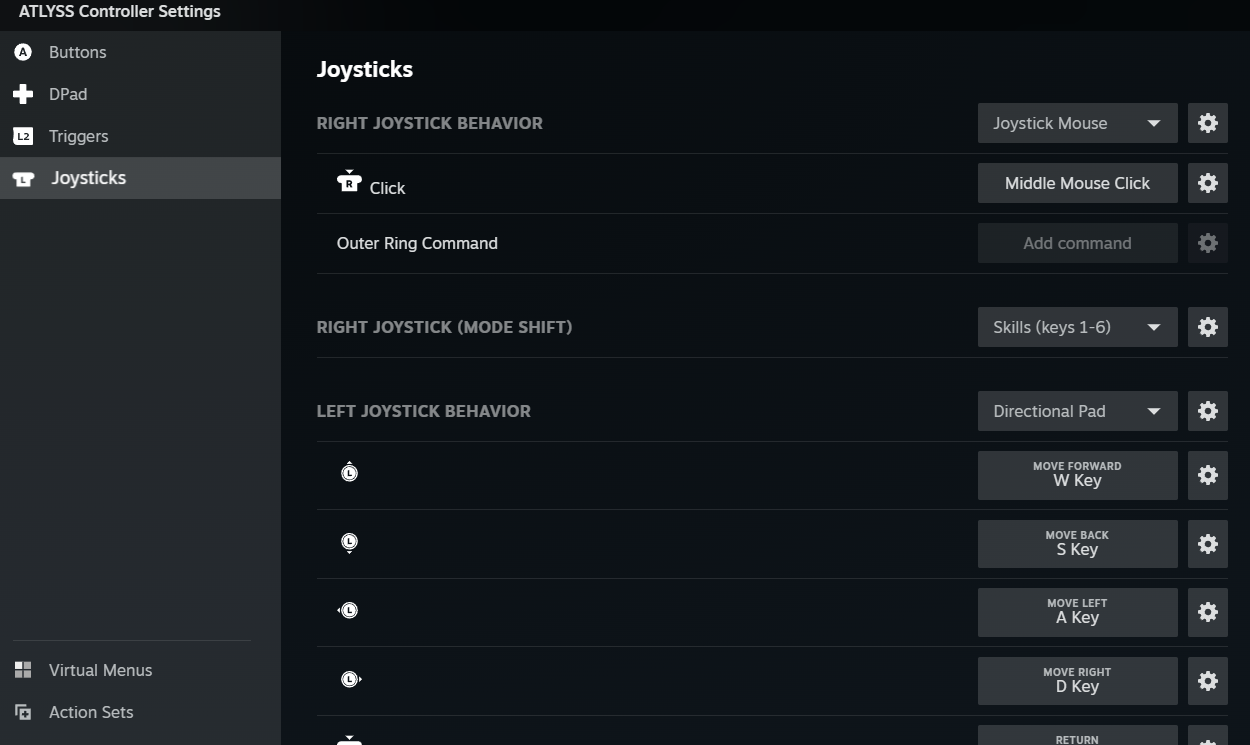
Whoa! It has all 6 hotbar skills on the right stick. How does that work? Virtual Menus. Virtual Menus allow you to create radial menus, hotbar menus, and touchscreen menus that appear through the Steam Overlay.
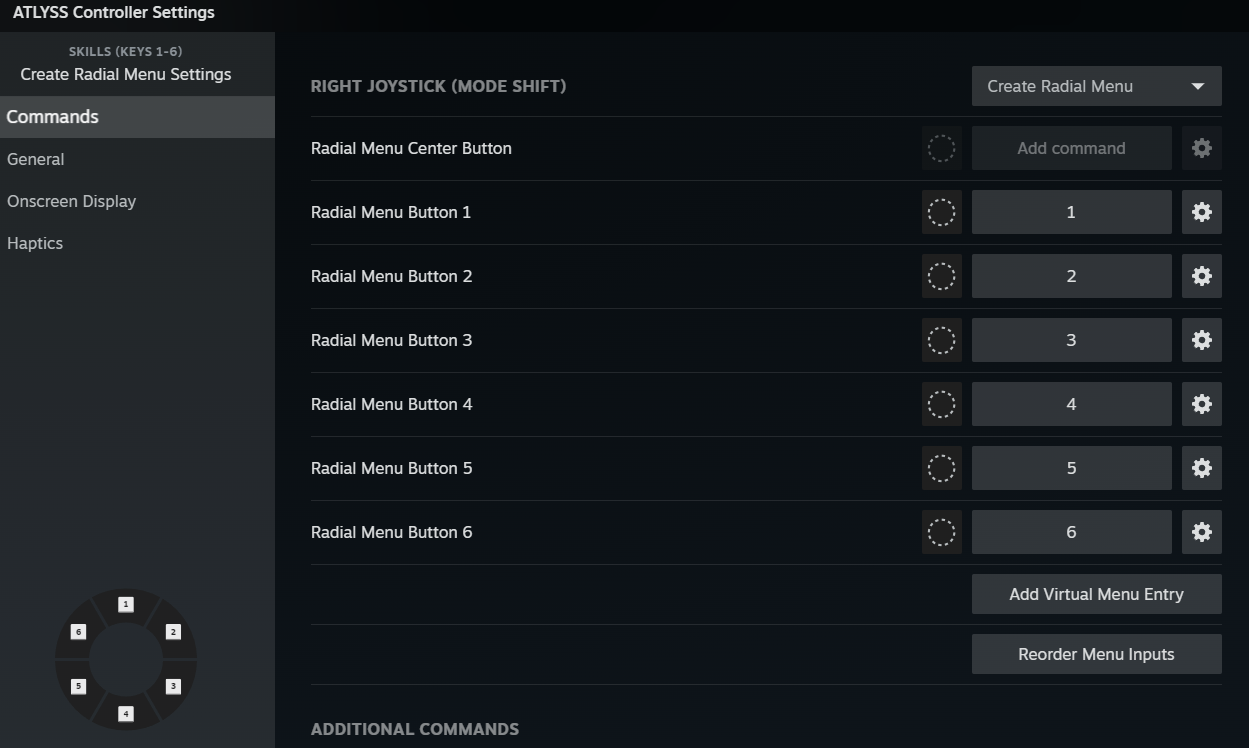
So, Cheddar has set up the configuration to bring up a radial menu for skills when pressing the left bumper. So cool! Obviously I’d need to play around with it and see how the radial menu feels in gameplay to render an actual judgment on whether I would want to use it, but in concept I love it. Mode Shift used right.
Limitations
Menus, in particular, are only navigable with a mouse cursor. All of the configurations I’ve highlighted here can navigate menus with a controller, but that means awkwardly controlling the cursor with the right stick. It’s not ideal, and it will always be slower and clumsier than using a mouse.
If in the future Kiseff adds keyboard navigation/selection to menus, controller input can become a lot better on this. It’s even possible to create Action Set Layers that automatically activate when the cursor is shown on screen (i.e. when any menu is open), which would allow controllers to seamlessly adjust for menu navigation.
Chatting also is just not going to be comfortable or quick with a controller. You’re just going to want to use a keyboard for that, always. It is what it is.
Outside of these two things though, controller feels very viable and very strong.

